I recently made a gameplay video for Reckpunk (see it here)
The gameplay sequences have been captured using the technique I described in my previous post about apitrace. Now, when making a gameplay video, you will want to include several part from the game, and to adjust the sequence based on the music and the specific moments you want to showcase. that mean you need:
- to select only the sequences you want.
- to renumber the png files of your sequences so in the end all the screencaps are in the correct order with no hole in the numbering
- to make transition between sequences when needed
- to compress the resulting video file effectively so it don’t take too long to upload to youtube and at the same time you still have the best quality.
For the points 1 and 2, after deleting the file I don’t need directly in the explorer, I used BulkRenameUtility to do the renumbering, here the parameters I used to rename my png sequences :
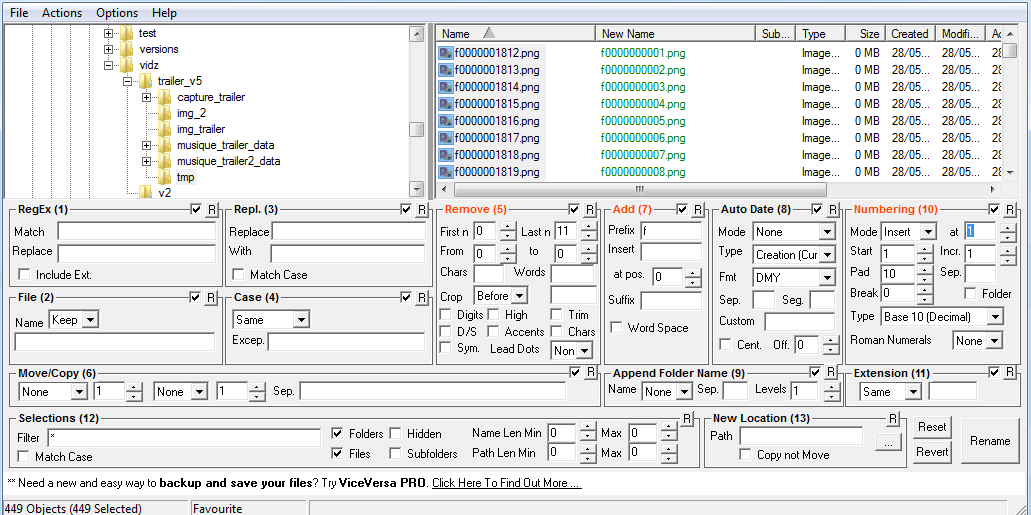
Basically, you erase the whole name of every files first (“remove” groupbox), and you replace it with your own (“add” groupbox), starting with the correct number (if the previous sequence has 150 png file, you put 151 in the start value of the “numbering” groupbox.
After that, you can have the need for some transition between sequences. The most common one is the fade in effect (slowly filling the screen with a color, usually it’s black).
Virtualdub will do for that, first, open the first png file of you whole sequence, then don’t forget to set the correct framerate (Video > Framerate). For my trailer, I put 60 in source framerate, then in frame rate conversion, I put 30.
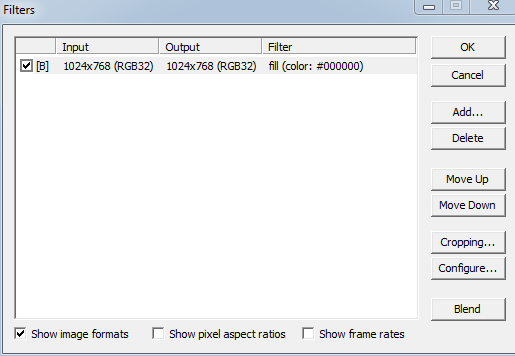
Now that the basic parameters are saved (file> save processing settings), you need to first add a filter that will fill the whole screen to black. Go to video > filter, then add the fill filter, and in configure, select the black color.
So we have our black color, but how can we fill the screen only at selected moment? and how can we blend gradually over time the gameplay sequence with the fill color?
Well, let’s have a look at the curve editor, to display it, go to view>curve editor

As you can see, we can select in the drop down list just at the top the filter that we want to operate on(here we have the fill filter and the value we can act upon (opacity curve))
Shift+click in the black area, and a line with a point will appear.
When the line is at the top, the filter is fully active, when at the bottom, the filter is not active. The number at the bottom represent the frames of the video, you can this way precisely control the filter frame by frame.
You can shift + click on the line to add another control point. to remove it, just ctrl + click it. To move it, just click and drag the control point where you want, it.
For now, just add one control point, and move it to the bottom, so our filter is not active, this way, the windows on the right let appear our gameplay sequence one again.
Now, add a second control point at the moment where you want the screen to be full black, and move it to the top of the curve editor. You will see the line connect the 2 points, and with that, your effect will change from the moment the movie hit the frame position of the first control point to the moment when it hit the second control point, gradually filling the screen with black. You can obviously add as much control points as you need to refine the effect.
Finally, let see how we export and compress our png sequence into a avi file so we can upload it to youtube:
First, you will need the CamStudio lossless codec, since youtube will perform it’s own compression, no need to use an “aggressive” compression codec like x264, we want to keep the best quality possible. For your information, exporting the avi file uncompressed will result in HUGE file. I got something like 1.5 Go for my 1024×768 30 seconds video when I used it. After I compressed it with CamStudio codec, the size got down to 150 Mo, and the quality is roughly the same.
After installing the the codec, go to video>compress and select the CamStudio codec.
If you want to add a soundtrack, just got to audio>audio from other file, and select you music track.
Finally, just save as avi and with that, you got your video file, ready to be uploaded!